深入了解 iOS 引用计数

iOS 通过引用计数来管理内存,简单的说就是当一个 id 类型的对象引用计数变成 0 的时候就会被销毁,回收内存。
本文将通过断点调试来探究引用计数的存储及读取在底层的实现。全程无聊,请配合源码阅读

源码版本:objc4-779.1
当然还是推荐使用这个来学习:可编译的源码

引用计数存储在哪

引用计数只适用于 id 类型的对象

有一种特殊的 id 类型对象,Tagged Pointer,如果不知道的话可以看我另一篇博客 深入了解Tagged Pointer了解一下

因为 Tagged Pointer 并不是真正的对象,所以它并不通过引用计数来管理其内存。
用下面的代码求 n1 的引用计数,输出结果为 9223372036854775807

1
2
3
// 创建一个 Tagged Pointer 对象
NSNumber *n1 = [NSNumber numberWithInt:1];
NSLog(@"n1 rc = %ld", CFGetRetainCount((__bridge CFTypeRef)(n1)));

我们知道每个 id 类型对象都有一个 isa 指针,其中只有 33 位用来保存其父类或者元类信息,剩余的31位也不能浪费啊,这其中就会一些 bit 用来保存引用计数。
下面是 arm64 架构下的 isa 结构

1
2
3
4
5
6
7
8
9
10
11
12
13
14
15
16
17
18
19
20
21
22
23
24
25
26
union isa_t {
isa_t() { }
isa_t(uintptr_t value) : bits(value) { }

Class cls;
uintptr_t bits;

struct {
# define ISA_MASK 0x0000000ffffffff8ULL
# define ISA_MAGIC_MASK 0x000003f000000001ULL
# define ISA_MAGIC_VALUE 0x000001a000000001ULL
# define ISA_BITFIELD \
uintptr_t nonpointer : 1; \
uintptr_t has_assoc : 1; \
uintptr_t has_cxx_dtor : 1; \
uintptr_t shiftcls : 33; /*MACH_VM_MAX_ADDRESS 0x1000000000*/ \
uintptr_t magic : 6; \
uintptr_t weakly_referenced : 1; \
uintptr_t deallocating : 1; \
uintptr_t has_sidetable_rc : 1; \
uintptr_t extra_rc : 19
# define RC_ONE (1ULL<<45)
# define RC_HALF (1ULL<<18)
};
#endif
};

可以发现,isa_t 是一个联合体(union),几个不同类型的变量 clas 和 bits 及 struct 共用同一段内存。当 isa 指针的第一位nonpointer为 1 时表示它是优化的 isa 指针,即将多余的 bit 用来存储其它信息,从它的名字nonpointer也可以看出它不再是一个纯粹的指针了。当为 1 时,第一个成员变量cls是没有用的,因为 isa 不再使用它来指向父类 cls。下面是 isa 指针各位域的含义

变量名 含义
nonpointer 表示是否对 isa 指针开启优化 0:纯isa指针,1:存储了额外信息
has_assoc 表示该对象是否包含 associated object,如果没有,则析构时会更快
has_cxx_dtor 表示该对象是否有 C++ 或 ARC 的析构函数,如果没有,则析构时更快
shiftcls 类的指针
magic 固定值 0x1a, 用于调试器判断当前对象是真的对象还是没有初始化的空间
weakly_referenced 表示该对象是否有过 weak 对象,如果没有,则析构时更快
deallocating 表示该对象是否正在析构
has_sidetable_rc 表示该对象的引用计数值是否过大无法存储在 isa 指针
extra_rc 存储引用计数值减一后的结果

在 arm64 下, isa 使用 19 个 bit 用来存储引用计数. 当引用计数超过这个数时,将会把 RC_HALF 数量的引用计数存储在一个全局哈希表中,此时 has_sidetable_rc 变为 1

增加引用计数

下面让我们通过调试来探究具体的存储过程
因为是在模拟器中运行的,isa 最多只能使用 8 个 bit 来存储引用计数, 即在 isa 中只能存储不超过 256 的数目。所以我们只要将对象的引用计数增加到 256 以上,那么系统就会将多余的引用计数存储到哈希表。

1
2
3
4
5
6
void foo(void) {
NSObject *o1 = [[NSObject alloc] init];
for (int i = 0; i < 500; i++) {
_objc_rootRetain(o1);
}
}

_objc_rootRetain()方法最终会调用objc_object::rootRetain(bool tryRetain, bool handleOverflow), 这个方法的代码如下:

1
2
3
4
5
6
7
8
9
10
11
12
13
14
15
16
17
18
19
20
21
22
23
24
25
26
27
28
29
30
31
32
33
34
35
36
37
38
39
40
41
42
43
44
45
46
47
48
49
50
51
52
53
54
55
56
57
58
59
60
61
62
63
64
65
66
ALWAYS_INLINE id 
objc_object::rootRetain(bool tryRetain, bool handleOverflow)
{
if (isTaggedPointer()) return (id)this;

bool sideTableLocked = false;
bool transcribeToSideTable = false;

isa_t oldisa;
isa_t newisa;

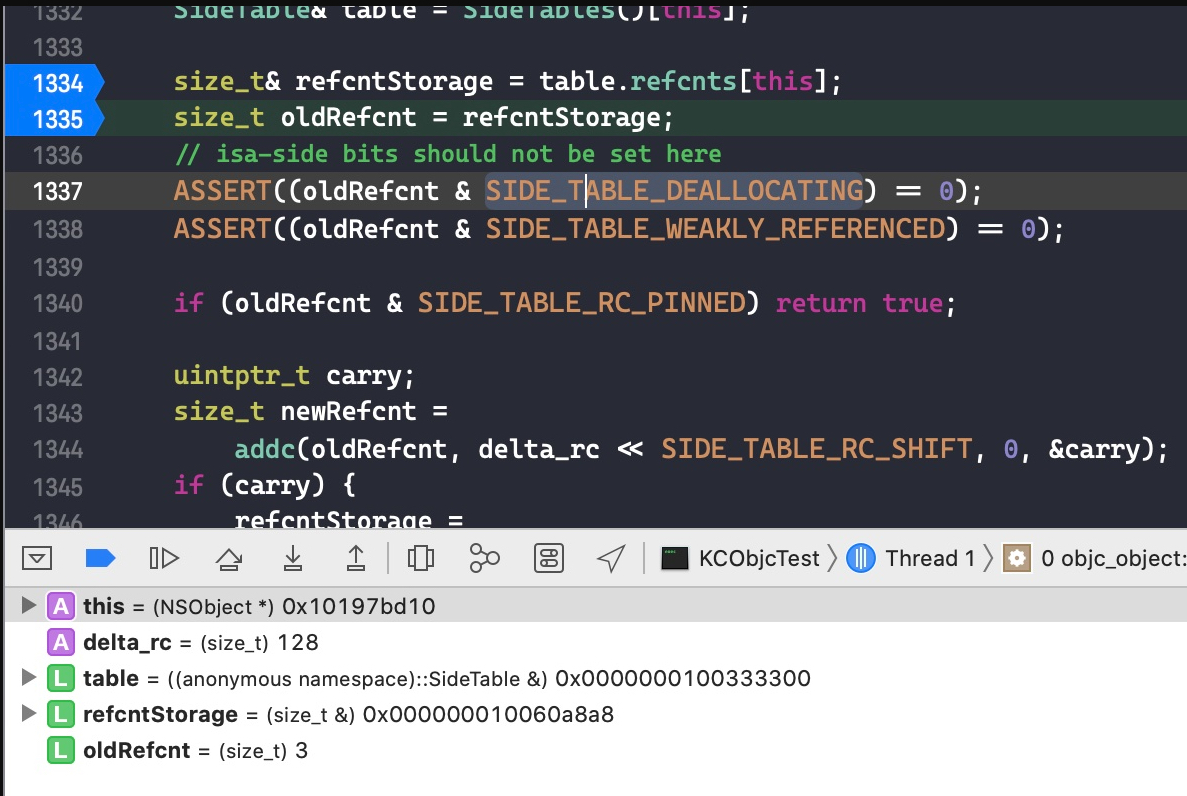
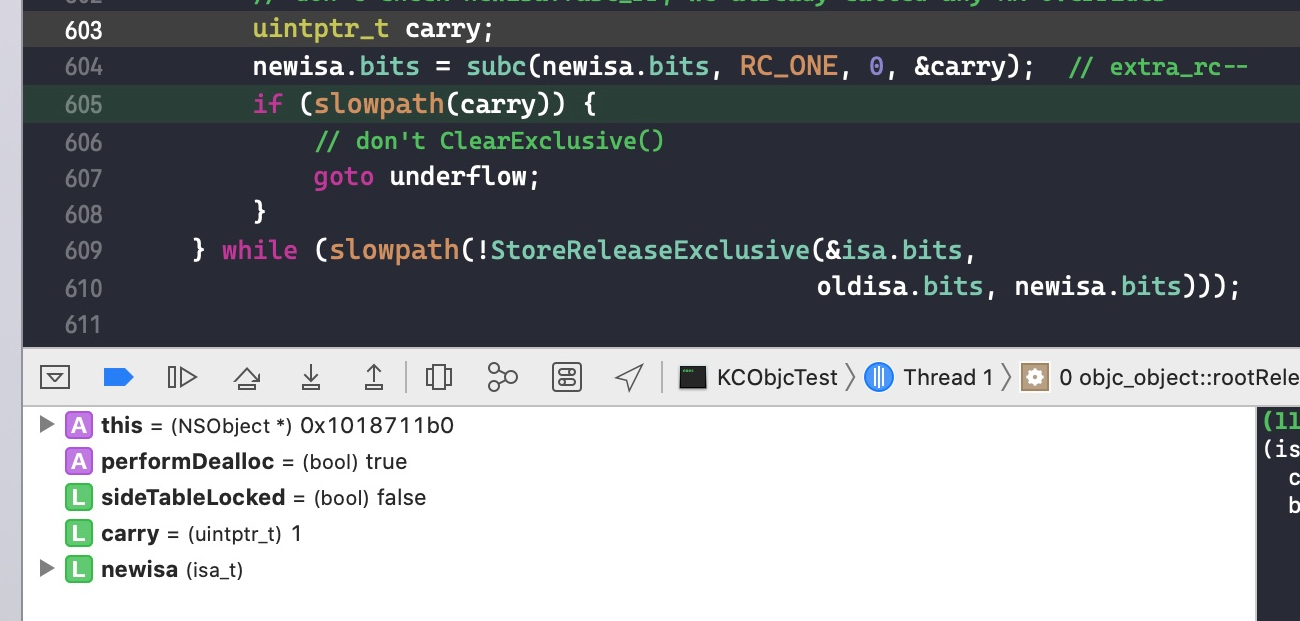
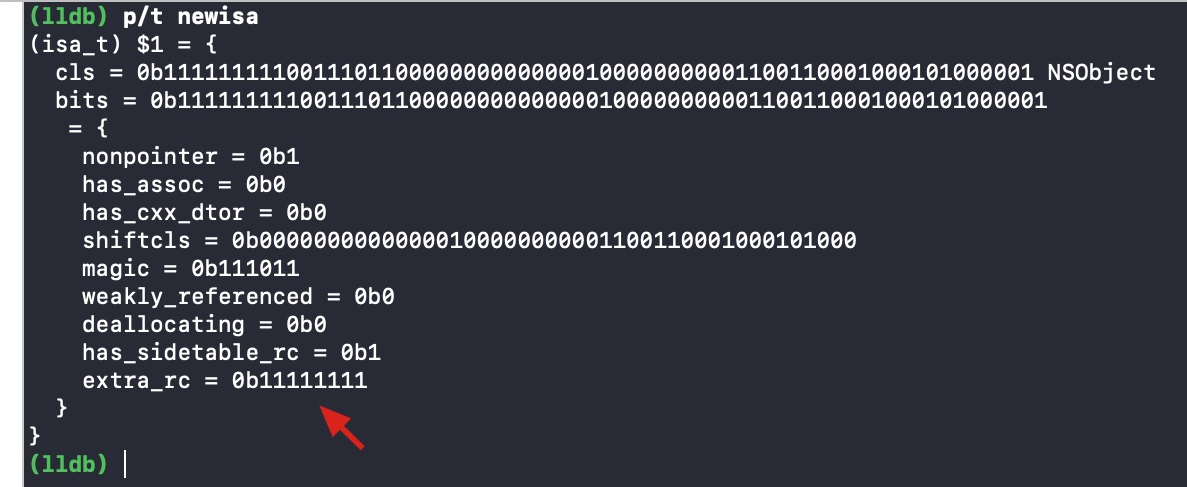
do {
// 是否将引用计数转移到索引表中
transcribeToSideTable = false;
// LoadExclusive 的作用是让读取操作原子化
oldisa = LoadExclusive(&isa.bits);
newisa = oldisa;
// if (slowpath) else (),表示大概率执行 else 后面的语句,用来提高效率。
// fastpath 则表示大概率执行 if 后面的语句
if (slowpath(!newisa.nonpointer)) {
// arm64 架构下,一般的对象 nonpointer 为YES,但也有特例,例如 block 的 nonpointer 为 False,即不使用 isa 保存额外信息
ClearExclusive(&isa.bits);
if (rawISA()->isMetaClass()) return (id)this;
if (!tryRetain && sideTableLocked) sidetable_unlock();
if (tryRetain) return sidetable_tryRetain() ? (id)this : nil;
else return sidetable_retain();
}
// don't check newisa.fast_rr; we already called any RR overrides
if (slowpath(tryRetain && newisa.deallocating)) {
ClearExclusive(&isa.bits);
if (!tryRetain && sideTableLocked) sidetable_unlock();
return nil;
}
// 用来表示 isa 指针的值是否溢出。因为引用计数存储在指针的高位,当引用计数增加到一定程度,会超过最高位的数字,此时 carry 的值不等于 0,表示溢出
uintptr_t carry;
// addc() 是一个内置函数,作用是将 isa 里面的引用计数 + 1 后保存
newisa.bits = addc(newisa.bits, RC_ONE, 0, &carry); // extra_rc++

if (slowpath(carry)) {
// newisa.extra_rc++ overflowed
// 移除的话则需要对多余的引用计数保存到索引表中。
// 刚开始进入的时候 handleOverflow == false
if (!handleOverflow) {
ClearExclusive(&isa.bits);
return rootRetain_overflow(tryRetain);
}
// 加锁
if (!tryRetain && !sideTableLocked) sidetable_lock();
// 此时 isa 指针存储的引用计数应该是满的, extra_rc 的 19 位都是 1,将 extra_rc 赋值为原来的一半,也就是将 isa 的最高位赋值为 0,这样做的目的是下次引用计数增加的时候可以直接存储在 isa 中,而不需要调用索引表来存储。将 has_sidetable_rc 赋值为 1,标记有额外的引用计数存储在索引表中
sideTableLocked = true;
transcribeToSideTable = true;
newisa.extra_rc = RC_HALF;
newisa.has_sidetable_rc = true;
}
// StoreExclusive(), 如果&isa.bits和oldisa.bits相等,那么就把newisa.bits的值赋给&isa.bits,并且返回true。
} while (slowpath(!StoreExclusive(&isa.bits, oldisa.bits, newisa.bits)));

if (slowpath(transcribeToSideTable)) {
// Copy the other half of the retain counts to the side table.
// 如果溢出的话,则将 isa 存储的引用计数赋值为最大值的一半,即 RC_HALF,那么减少的一半则转移到索引表中
sidetable_addExtraRC_nolock(RC_HALF);
}

if (slowpath(!tryRetain && sideTableLocked)) sidetable_unlock();
return (id)this;
}

写了点注释帮助你们理解. 现在我们在sidetable_addExtraRC_nolock(RC_HALF);那一行打个断点,启动程序

step into进入这个方法

因为用的模拟器,所以 RC_HALF == delta_rc == 128,符合预期。

代码SideTable& table = SideTables()[this],通过计算指针值得到哈希值获取到对应的 sidetable
让我们点开方法SideTables()

1
2
3
4
5
static objc::ExplicitInit<StripedMap<SideTable>> SideTablesMap;

static StripedMap<SideTable>& SideTables() {
return SideTablesMap.get();
}

class ExplicitInit 的定义

1
2
3
4
5
6
7
8
9
10
11
12
13
14
template <typename Type>
class ExplicitInit {
alignas(Type) uint8_t _storage[sizeof(Type)];

public:
template <typename... Ts>
void init(Ts &&... Args) {
new (_storage) Type(std::forward<Ts>(Args)...);
}

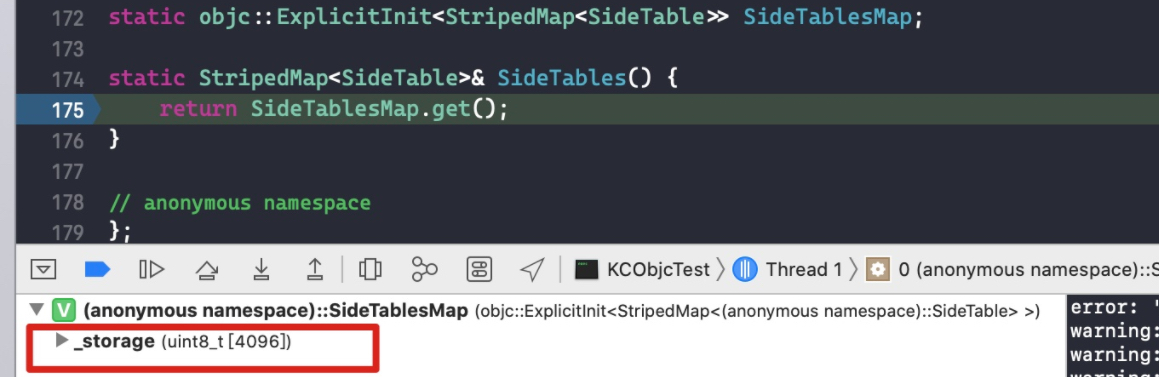
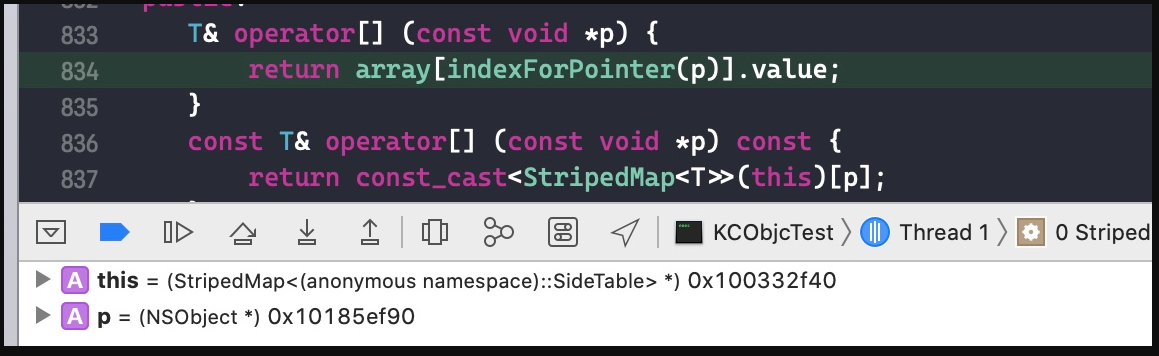
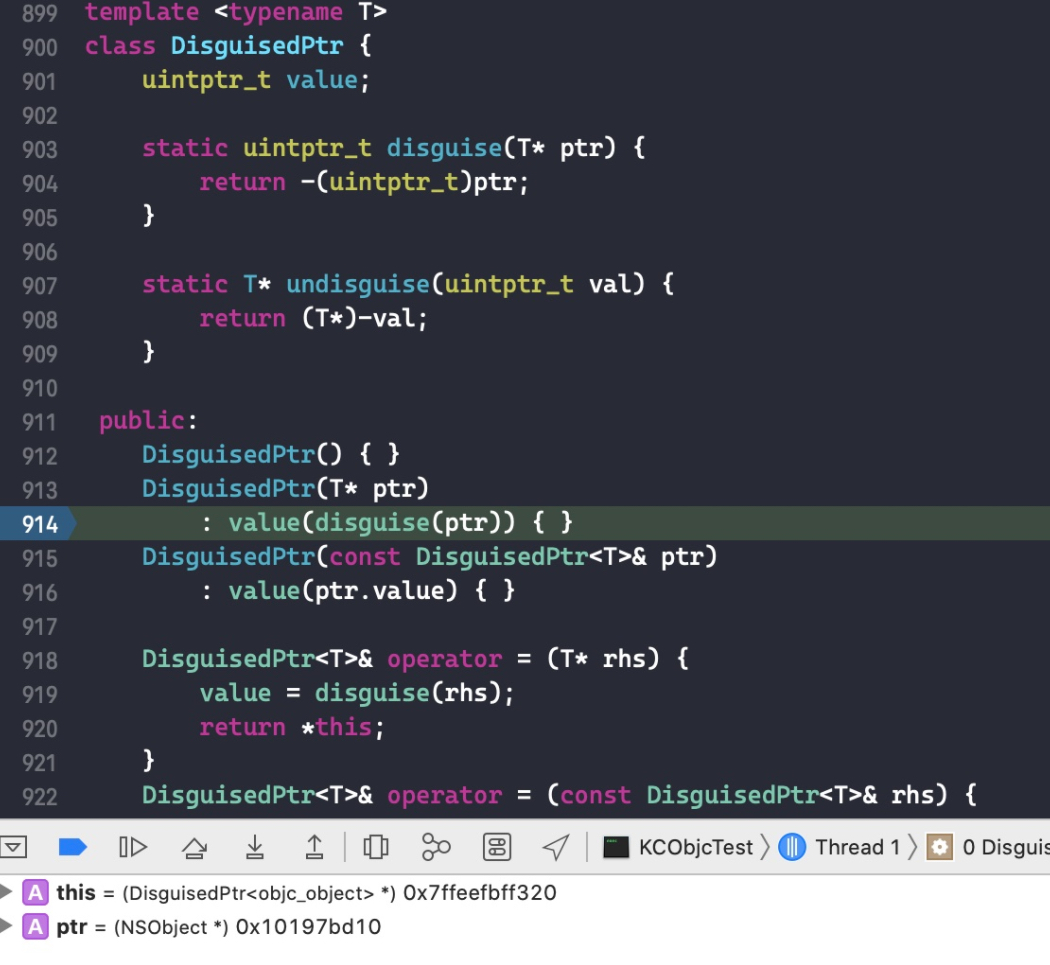
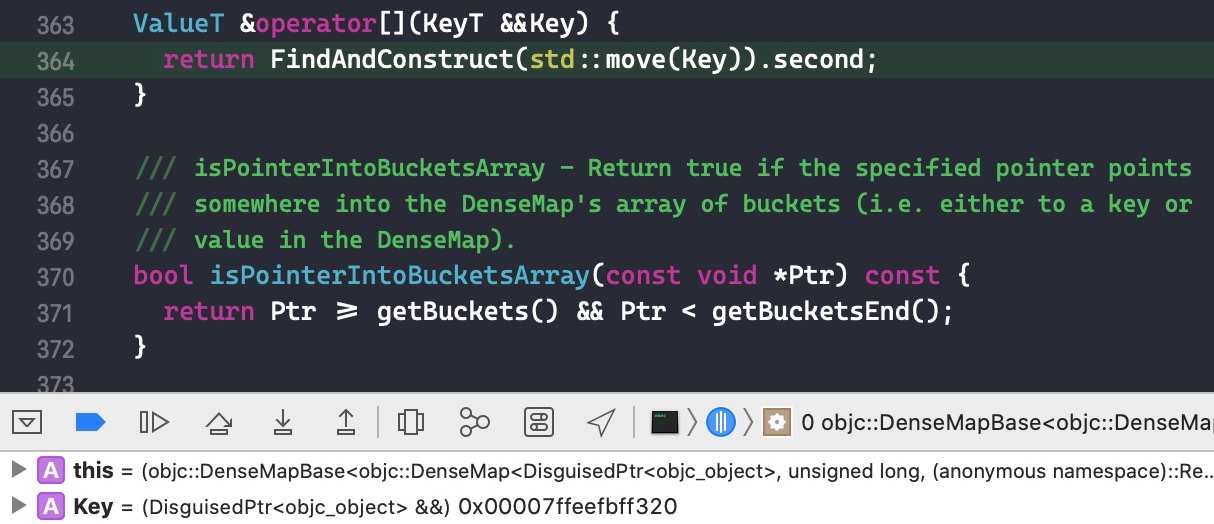
Type &get() {
return *reinterpret_cast<Type *>(_storage);
}
};

ExplicitInit的作用是生成一个模板类型 Type 的实例。alignas(Type) uint8_t _storage[sizeof(Type)];成员变量_storage是一个 sizeof(Type) 长度的 uint8_t 数组,而 uint8_t 占用一个字节,所以实际上_storage的长度跟一个 Type 实例所占用的内存是一样多的。成员函数 Type &get() 将 _storage 数组指针用reinterpret_cast<Type *>强转成了 Type * 类型指针,前面再加一个 *,说明返回的实际上是 Type 实例内存的首地址。而另一个成员函数init用来初始化生成的 Type 实例。

所以static StripedMap<SideTable>& SideTables()函数实际上返回了一个全局静态StripedMap<SideTable>的实例。
下面是class StripedMap的部分定义

1
2
3
4
5
6
7
8
9
10
11
12
13
14
15
16
17
18
19
20
21
22
23
24
25
template<typename T>
class StripedMap {
#if TARGET_OS_IPHONE && !TARGET_OS_SIMULATOR
enum { StripeCount = 8 };
#else
enum { StripeCount = 64 };
#endif

struct PaddedT {
T value alignas(CacheLineSize);
};

PaddedT array[StripeCount];

static unsigned int indexForPointer(const void *p) {
uintptr_t addr = reinterpret_cast<uintptr_t>(p);
return ((addr >> 4) ^ (addr >> 9)) % StripeCount;
}

public:
T& operator[] (const void *p) {
return array[indexForPointer(p)].value;
}
// ...省略
}
  • 局部结构体PaddedT的作用是用来内存对齐,常量CacheLineSize是固定值 64。在 arm64 架构下,成员变量array是一个长度为 8,元素类型为 T,每个元素占 64 字节的数组,而在模拟器下是一个长度为 64,每个元素占 64 字节的数组。
  • 成员函数indexForPointer用来根据指针来计算哈希值,确定对应于array里面第几个元素。
  • T& operator[] (const void *p)使用 operator 关键字重载了[]符号。举个例子,StripedMap 有一个实例 sm,有一个 int 类型的变量 a,当执行sm[&a]的代码时,就会跳转到T& operator[] (const void *p)这个方法里面。而在上面的重载[]函数中,传入的参数为指针类型,然后计算出其数组 index,返回对应的元素 T,也就是 SideTable

继续调试,断点此时在SideTable& table = SideTables()[this];这一行。点击 step into

_storage的数组长度为 4096,也就是 64 * 64,符合预期。继续step into,最终会跳转到下面这里

跳转到了重载的[]方法里面了。

目前已知道的情报就是,有一个全局的StripedMap条目索引,里面包含了若干个SideTable索引表。在使用时,根据指针得到对应的 sidetable。SideTable 的部分定义如下

1
2
3
4
5
6
7
8
9
10
11
12
13
struct SideTable {
spinlock_t slock;
RefcountMap refcnts;
weak_table_t weak_table;

SideTable() {
memset(&weak_table, 0, sizeof(weak_table));
}
void lock() { slock.lock(); }
void unlock() { slock.unlock(); }
void forceReset() { slock.forceReset(); }
// ...省略
};

SideTable 的成员对象里面有一个自旋锁,引用映射表RefcountMap refcnts,弱引用表weak_table_t weak_table。在上面我们提到了每个 sidetable 占用 64 个字节, 那是因为 spinlock_t 占用 4, RefcountMap 占用 24, weak_table_t 占用 32, 加起来就是 64.
在这里我们只了解下 RefcountMap, 因为它跟我们引用计数相关.
RefcountMap是一个类型别名,它的定义如下:

1
typedef objc::DenseMap<DisguisedPtr<objc_object>,size_t,RefcountMapValuePurgeable> RefcountMap;

先别急着查看DenseMap的定义,我们先看看DisguisedPtr是个什么类。它的定义如下:

1
2
3
4
5
6
7
8
9
10
11
12
13
14
15
16
17
18
19
20
21
22
23
24
25
26
27
28
29
30
31
32
33
34
35
36
37
38
39
40
41
template <typename T>
class DisguisedPtr {
uintptr_t value;

static uintptr_t disguise(T* ptr) {
return -(uintptr_t)ptr;
}

static T* undisguise(uintptr_t val) {
return (T*)-val;
}

public:
DisguisedPtr() { }
DisguisedPtr(T* ptr)
: value(disguise(ptr)) { }
DisguisedPtr(const DisguisedPtr<T>& ptr)
: value(ptr.value) { }

DisguisedPtr<T>& operator = (T* rhs) {
value = disguise(rhs);
return *this;
}
DisguisedPtr<T>& operator = (const DisguisedPtr<T>& rhs) {
value = rhs.value;
return *this;
}

operator T* () const {
return undisguise(value);
}
T* operator -> () const {
return undisguise(value);
}
T& operator * () const {
return *undisguise(value);
}
T& operator [] (size_t i) const {
return undisguise(value)[i];
}
};
  • 简单的说, 你可以像指针Type *一样的使用DisguisedPtr,但是其成员变量value保存的是伪装后的指针值。伪装函数是disguise(),0 和 0x800…00 经过伪装之后还是本身,但指针值也不可能是这两个值,所以无所谓的。
  • 为了能像指针Type *一样的使用DisguisedPtr,在DisguisedPtr内部,重载了许多符号,例如 [], =, *, ()。具体就不分析了。
  • 该类的作用是为了避免直接引用指针, 防止被 leaks 内存检测工具检测出内存泄漏

class RefcountMapValuePurgeable的定义如下:

1
2
3
4
5
struct RefcountMapValuePurgeable {
static inline bool isPurgeable(size_t x) {
return x == 0;
}
};

它只有一个内联函数,根据 x 是否为 0 返回一个 bool 值。它的作用就是根据参数判断是否需要析构这个实例
好了,了解完了DisguisedPtrRefcountMapValuePurgeable,接下来我们来看DenseMap,它的定义如下

1
2
3
4
5
6
7
8
9
10
11
12
13
14
15
16
17
18
template <typename KeyT, typename ValueT,
typename ValueInfoT = DenseMapValueInfo<ValueT>,
typename KeyInfoT = DenseMapInfo<KeyT>,
typename BucketT = detail::DenseMapPair<KeyT, ValueT>>
class DenseMap : public DenseMapBase<DenseMap<KeyT, ValueT, ValueInfoT, KeyInfoT, BucketT>,
KeyT, ValueT, ValueInfoT, KeyInfoT, BucketT> {
friend class DenseMapBase<DenseMap, KeyT, ValueT, ValueInfoT, KeyInfoT, BucketT>;

using BaseT = DenseMapBase<DenseMap, KeyT, ValueT, ValueInfoT, KeyInfoT, BucketT>;

BucketT *Buckets;
unsigned NumEntries;
unsigned NumTombstones;
unsigned NumBuckets;

public:
explicit DenseMap(unsigned InitialReserve = 0) { init(InitialReserve); }
}
  • 代码friend class DenseMapBase的作用是声明一个友元类DenseMapBase,这样DenseMapBase在内存可以直接访问DenseMap private 的成员函数。
  • 代码using BaseT = DenseMapBase的作用是为DenseMapBase指定一个别名BaseT
  • 函数explicit DenseMap(), explicit的作用是用来声明类构造函数是显示调用的,而非隐式调用。

DenseMap里面有 4 个成员变量,Buckets 和 NumEntries,NumTombstones, NumBuckets。

  • Buckets, 存储引用计数的数组, 元素类似于字典, key 为指针, value 为引用计数. 数组可扩容
  • NumEntries 表示数组中用来存储引用计数的元素有几个
  • NumTombstones 数组中元素被用来存储一个对象的引用计数, 当这个对象被销毁后, 该元素被标记为墓碑. 该变量用来表示有多少个这种元素
  • NumBuckets 数组 Buckets 的长度

再来看一下模板里的几个类型 DenseMapInfo<KeyT>, detail::DenseMapPair<KeyT, ValueT>

DenseMapInfo 有很多的模板定义,可以适用于各种类型。

1
2
3
4
5
6
7
8
9
10
11
12
13
14
15
template<typename T>
struct DenseMapInfo<DisguisedPtr<T>> {
static inline DisguisedPtr<T> getEmptyKey() {
return DisguisedPtr<T>((T*)(uintptr_t)-1);
}
static inline DisguisedPtr<T> getTombstoneKey() {
return DisguisedPtr<T>((T*)(uintptr_t)-2);
}
static unsigned getHashValue(const T *PtrVal) {
return ptr_hash((uintptr_t)PtrVal);
}
static bool isEqual(const DisguisedPtr<T> &LHS, const DisguisedPtr<T> &RHS) {
return LHS == RHS;
}
};

内联函数getEmptyKeygetTombstoneKey均返回一个特征值,用来标记 bucket 的状态 Empty 和 Tombstone。
静态函数getHashValue根据指针计算出哈希值。
ptr_hash()的实现如下:

1
2
3
4
5
6
7
static inline uint32_t ptr_hash(uint64_t key)
{
key ^= key >> 4;
key *= 0x8a970be7488fda55;
key ^= __builtin_bswap64(key);
return (uint32_t)key;
}

看不懂,知道是计算哈希值的就好了。

最后一个静态函数isEqual用来比较两个参数是否相等。

接着看detail::DenseMapPair<KeyT, ValueT> 它的定义如下

1
2
3
4
5
6
7
8
9
10
11
12
13
14
15
16
17
18
19
20
21
22
23
24
25
26
27
28
29
template <typename KeyT, typename ValueT>
struct DenseMapPair : public std::pair<KeyT, ValueT> {
DenseMapPair() {}

DenseMapPair(const KeyT &Key, const ValueT &Value)
: std::pair<KeyT, ValueT>(Key, Value) {}

DenseMapPair(KeyT &&Key, ValueT &&Value)
: std::pair<KeyT, ValueT>(std::move(Key), std::move(Value)) {}

template <typename AltKeyT, typename AltValueT>
DenseMapPair(AltKeyT &&AltKey, AltValueT &&AltValue,
typename std::enable_if<
std::is_convertible<AltKeyT, KeyT>::value &&
std::is_convertible<AltValueT, ValueT>::value>::type * = 0)
: std::pair<KeyT, ValueT>(std::forward<AltKeyT>(AltKey),
std::forward<AltValueT>(AltValue)) {}

template <typename AltPairT>
DenseMapPair(AltPairT &&AltPair,
typename std::enable_if<std::is_convertible<
AltPairT, std::pair<KeyT, ValueT>>::value>::type * = 0)
: std::pair<KeyT, ValueT>(std::forward<AltPairT>(AltPair)) {}

KeyT &getFirst() { return std::pair<KeyT, ValueT>::first; }
const KeyT &getFirst() const { return std::pair<KeyT, ValueT>::first; }
ValueT &getSecond() { return std::pair<KeyT, ValueT>::second; }
const ValueT &getSecond() const { return std::pair<KeyT, ValueT>::second; }
};

看起来很复杂的样子,但其实只要知道它的父类std::pair是干嘛的就好了。
std::pair的作用是将两个数据组合成一个数据,两个数据可以是同一类型或者不同类型。它是一个模板结构体,主要的两个成员变量是first和second,这两个变量可以直接使用。
再根据注释,可以推测出DenseMapPair作用是将 keyT 和 ValueT 两个类型的值保存在一起

继续之前的调试,在代码size_t& refcntStorage = table.refcnts[this];打个断点,然后点击 continue program execution 跳转过去。

注意这里的size_t&符号不是取内存地址意思,& 在这里表示引用的意思。举个例子

1
2
3
int a = 1;
int& b = a;
b = 10;

对 b 赋值 10 后,a 的值也变成了 10。好了,继续

继续 step into

首先会跳转到类DisguisedPtr的一个初始化方法里面,这里对指针进行伪装并赋值给了成员对象 value。
继续 step into

跳转到了这里。可以看出来DenseMap的父类DenseMapBase也重载了[]方法。
参数类型为KeyT &&,也就是DisguisedPtr<objc_object> &&类型。这里的&&符号以及下面的std::move(Key)函数都是为了确定参数是右值引用,实现移动语义,减少不必要的参数拷贝。

继续 step into,跳转到了下面这里

之前我们讲DenseMapPair<KeyT, ValueT>的时候说到过,这个类的作用是将两个类型的值的组合成一个整体,类似于我们平常使用的字典。key 对应 first, value 对应 second。在FindAndConstruct方法中,首先会通过LookupBucketFor()查找是否已经有存在的 bucket,如果没有则通过InsertIntoBucket函数生成并返回对应的 bucket。

下面是LookupBucketFor()函数的实现

1
2
3
4
5
6
7
8
9
10
11
12
13
14
15
16
17
18
19
20
21
22
23
24
25
26
27
28
29
30
31
32
33
34
35
36
37
38
39
40
41
42
43
44
45
46
47
48
49
50
51
52
53
54
55
56
57
58
59
60
61
62
63
64
65
66
67
68
template<typename LookupKeyT>
bool LookupBucketFor(const LookupKeyT &Val,
const BucketT *&FoundBucket) const {
// 返回成员变量 Buckets
const BucketT *BucketsPtr = getBuckets();
// 返回成员变量 NumBuckets
const unsigned NumBuckets = getNumBuckets();

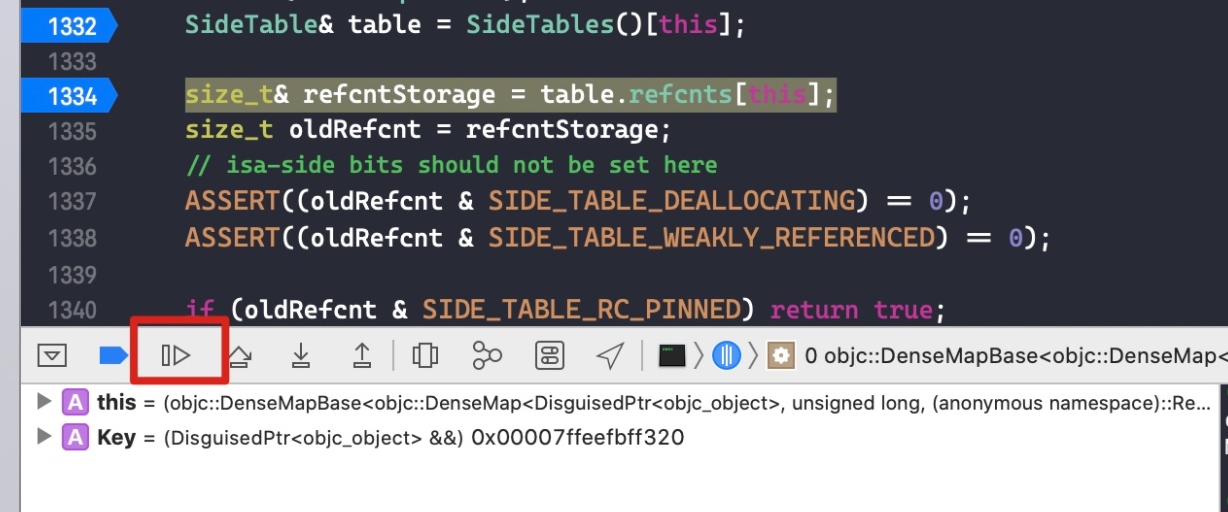
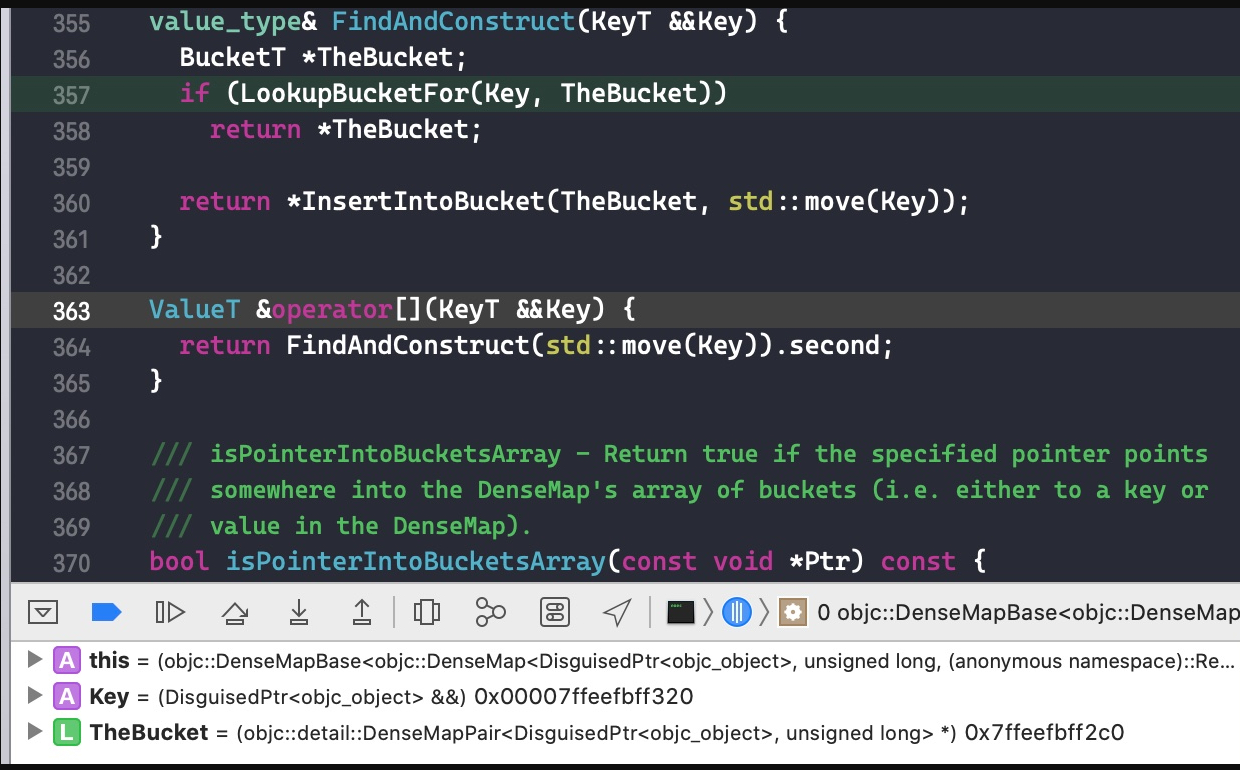
if (NumBuckets == 0) {
FoundBucket = nullptr;
return false;
}

// 保存在查找过程中碰到的墓碑
const BucketT *FoundTombstone = nullptr;
// DenseMapInfo 的内联函数 getEmptyKey
const KeyT EmptyKey = getEmptyKey();
// DenseMapInfo 的内联函数 getTombstoneKey
const KeyT TombstoneKey = getTombstoneKey();
assert(!KeyInfoT::isEqual(Val, EmptyKey) &&
!KeyInfoT::isEqual(Val, TombstoneKey) &&
"Empty/Tombstone value shouldn't be inserted into map!");

//DenseMapInfo 的静态函数 getHashValue 计算哈希值,并与 NumBuckets-1 进行与运算,得到对应 BucketT 实例的 index
unsigned BucketNo = getHashValue(Val) & (NumBuckets-1);
// 查找次数
unsigned ProbeAmt = 1;
while (true) {
const BucketT *ThisBucket = BucketsPtr + BucketNo;
// Found Val's bucket? If so, return it.
// 找到了对应的 BucketT 实例
if (LLVM_LIKELY(KeyInfoT::isEqual(Val, ThisBucket->getFirst()))) {
FoundBucket = ThisBucket;
return true;
}

// If we found an empty bucket, the key doesn't exist in the set.
// Insert it and return the default value.
// 如果对应的 bucket 是空的。如果是第一次查找的话则在这个 bucket 里面插入 key 和 value(在InsertIntoBucket函数中执行)。如果不是第一次并且之前找到了墓碑,则使用墓碑bucket插入key和value
if (LLVM_LIKELY(KeyInfoT::isEqual(ThisBucket->getFirst(), EmptyKey))) {
// If we've already seen a tombstone while probing, fill it in instead
// of the empty bucket we eventually probed to.
FoundBucket = FoundTombstone ? FoundTombstone : ThisBucket;
return false;
}

// If this is a tombstone, remember it. If Val ends up not in the map, we
// prefer to return it than something that would require more probing.
// Ditto for zero values.
// 如果找到一个墓碑,则使用 FoundTombstone 将这个墓碑记录下来
if (KeyInfoT::isEqual(ThisBucket->getFirst(), TombstoneKey) &&
!FoundTombstone)
FoundTombstone = ThisBucket; // Remember the first tombstone found.
// 如果 FoundTombstone 为空并且 对应的 bucket 的 second 是 0,则用FoundTombstone保存下这个bucket
if (ValueInfoT::isPurgeable(ThisBucket->getSecond()) && !FoundTombstone)
FoundTombstone = ThisBucket;

// Otherwise, it's a hash collision or a tombstone, continue quadratic
// probing.
// 如果查找次数多余 NumBuckets ,则报错
if (ProbeAmt > NumBuckets) {
FatalCorruptHashTables(BucketsPtr, NumBuckets);
}
// 重新计算 BucketNo,重新查找
BucketNo += ProbeAmt++;
BucketNo &= (NumBuckets-1);
}
}

在上面的代码里写了点注释帮助理解。
bucket 有两种状态,一种是 Empty,这个表示当前这个 bucket 还没有被使用的标记;另一个状态是 TombstoneKey,当一个 bucket 被使用了,当对象释放后该 bucket 被定义为这种状态

通过FindAndConstruct函数的分析我们知道,如果已经存在 bucket,则返回 YES,并将指针 TheBucket 指向这个 bucket。如果存在一个墓碑或者空的 bucket,则返回 false,并将指针 TheBucket 指向这个 bucket。

接着分析InsertIntoBucket(),下面是它的实现:

1
2
3
4
5
6
7
8
9
10
11
12
13
14
15
16
17
18
19
20
21
22
23
24
25
26
27
28
29
30
31
32
33
34
35
36
37
38
39
40
41
42
43
44
45
46
47
48
49
50
51
52
53
54
55
56
57
58
59
60
61
template <typename KeyArg, typename... ValueArgs>
BucketT *InsertIntoBucket(BucketT *TheBucket, KeyArg &&Key,
ValueArgs &&... Values) {
TheBucket = InsertIntoBucketImpl(Key, Key, TheBucket);

// 保存 key 到 bucket 的成员变量 first 中
TheBucket->getFirst() = std::forward<KeyArg>(Key);
// 初始化 ValueT 的实例并保存到 bucket 的成员变量 second 中
::new (&TheBucket->getSecond()) ValueT(std::forward<ValueArgs>(Values)...);
return TheBucket;
}

template <typename LookupKeyT>
BucketT *InsertIntoBucketImpl(const KeyT &Key, const LookupKeyT &Lookup,
BucketT *TheBucket) {
// If the load of the hash table is more than 3/4, or if fewer than 1/8 of
// the buckets are empty (meaning that many are filled with tombstones),
// grow the table.
//
// The later case is tricky. For example, if we had one empty bucket with
// tons of tombstones, failing lookups (e.g. for insertion) would have to
// probe almost the entire table until it found the empty bucket. If the
// table completely filled with tombstones, no lookup would ever succeed,
// causing infinite loops in lookup.
unsigned NewNumEntries = getNumEntries() + 1;
unsigned NumBuckets = getNumBuckets();
// 当 buckets 数组已经使用了超过 3/4 或者 空bucket的数量小于 1/8,则增加 buckets 数组的长度。
if (LLVM_UNLIKELY(NewNumEntries * 4 >= NumBuckets * 3)) {
// 扩增原来的 NumBuckets,新的 buckets 长度为旧的两倍,长度至少为 4。新的 buckets 生成后将旧数组里面的数据转移过去,并且旧数组删除
this->grow(NumBuckets * 2);
// 因为重新生成了 buckets 数组,所以需要使用LookupBucketFor重新查找对应bucket,并用指针 TheBucket 指向
LookupBucketFor(Lookup, TheBucket);
NumBuckets = getNumBuckets();
} else if (LLVM_UNLIKELY(NumBuckets-(NewNumEntries+getNumTombstones()) <=
NumBuckets/8)) {
this->grow(NumBuckets);
LookupBucketFor(Lookup, TheBucket);
}
ASSERT(TheBucket);

// Only update the state after we've grown our bucket space appropriately
// so that when growing buckets we have self-consistent entry count.
// If we are writing over a tombstone or zero value, remember this.
if (KeyInfoT::isEqual(TheBucket->getFirst(), getEmptyKey())) {
// Replacing an empty bucket.
// 使用空bucket,NumEntries + 1
incrementNumEntries();
} else if (KeyInfoT::isEqual(TheBucket->getFirst(), getTombstoneKey())) {
// Replacing a tombstone.
// 使用墓碑 bucket,NumEntries + 1, NumTombstones - 1
incrementNumEntries();
decrementNumTombstones();
} else {
// we should be purging a zero. No accounting changes.
// 如果 second 等于 0,则析构 second
ASSERT(ValueInfoT::isPurgeable(TheBucket->getSecond()));
TheBucket->getSecond().~ValueT();
}

return TheBucket;
}

通过InsertIntoBucket函数我们了解到,当 buckets 数组已经使用了超过 3/4 或者 空bucket的数量小于 1/8,则会生成一个新的 buckets,长度为原来的2倍(最小为4),并将旧数组的数据转移到新数组中,并重新查找 TheBucket 的 index。最后将伪装后的指针保存到bucket的first中,将引用计数保存到bucket的second中。

理论分析到这里。这几个函数的调试我就不贴出来了,比较长,你们可以自己调试下。

接下来在代码size_t oldRefcnt = refcntStorage;中打个断点,点击 continue program execution 跳转过去。

让我们回到objc_object::sidetable_addExtraRC_nolock函数中。因为我们刚刚在 sidetable 索引表里面插入了 bucket,所以这里 oldRefcnt 的值 为 0。
接下来会对 oldRefcnt 进行校验,这说明 oldRefcnt 并没有把所有的 bit 都用来保存引用计数。

  • 低 1 位(从低位往高位数第一位)用来标记是否是弱引用
  • 低 2 位用来标记该变量是否在析构
  • 高 1 位(从高位往低位数第一位)用来标记保存的引用计数是否已经溢出。

下面的代码我们好像看到过了,对,在将引用计数保存在 isa 指针那里

1
2
3
4
5
6
7
8
9
10
11
12
uintptr_t carry;
size_t newRefcnt =
addc(oldRefcnt, delta_rc << SIDE_TABLE_RC_SHIFT, 0, &carry);
if (carry) {
refcntStorage =
SIDE_TABLE_RC_PINNED | (oldRefcnt & SIDE_TABLE_FLAG_MASK);
return true;
}
else {
refcntStorage = newRefcnt;
return false;
}

这几句的代码的作用是将 newRefcnt = oldRefcnt + delta_rc,如果值太大了溢出了则将 carry 赋值为1,并将 refcntStorage 的高1位赋值为1,并返回true。如果没有溢出的话则将 newRefcnt 赋值到 refcntStorage,并返回 false。

到这里,我们探究了当引用计数增加时,如何保存多余的引用计数。简单的归纳下:

  • 有一个静态全局变量 SideTablesMap,实际上是 StripedMap 的实例。以便于在程序初始化的时候就能用到
  • 变量 SideTablesMap 里面有一个长度为 8,类型为 SideTable 的数组成员array,每个元素占用的内存为64(spinlock_t内存4, RefcountMap内存24,weak_table_t内存32)。在保存引用计数的时候,根据指针地址来计算出相应 SideTable 的 index。
  • 获取到相应的 SideTable 后,根据指针地址计算出相应的哈希值,然后查找 bucket。如果 bucket 不存在,则使用空 bucket 或者 墓碑 bucket。如果 bucket 的数量不够则扩容。将指针为 key 和 引用计数 为 value 保存到 bucket 当中。

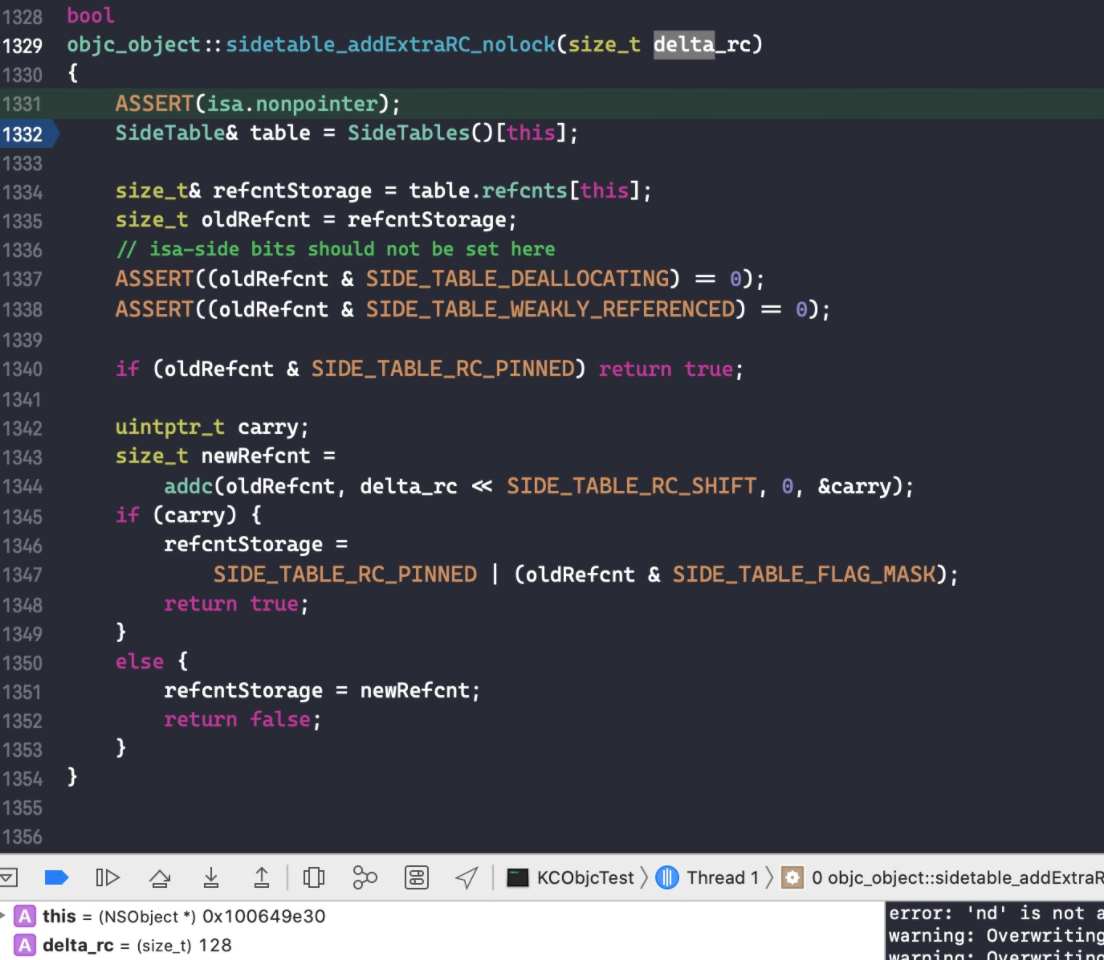
注意:当一个对象创建后它的引用计数为 1,但是 isa 指针里的引用计数还是 0。因为初始化的时候并没有对引用计数进行操作。

减少引用计数

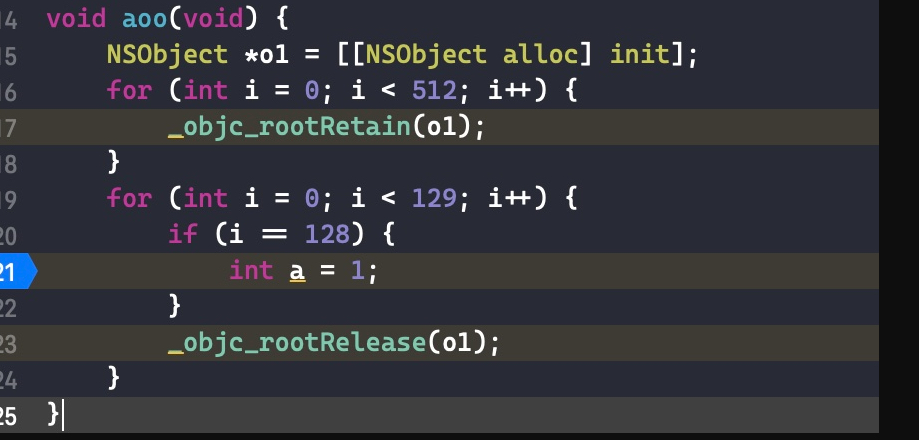
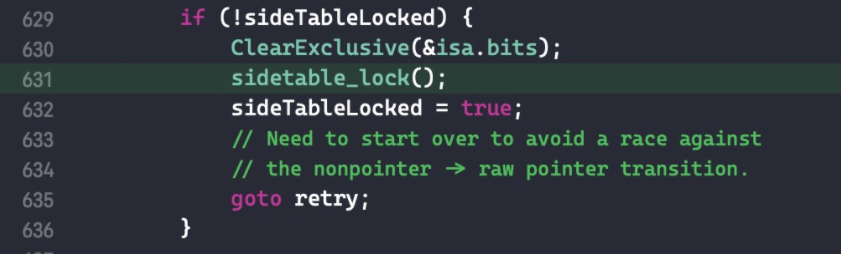
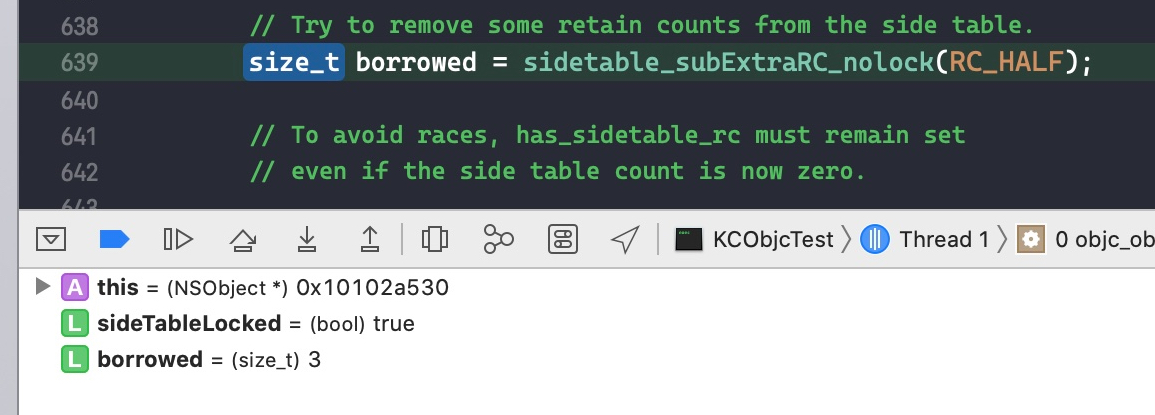
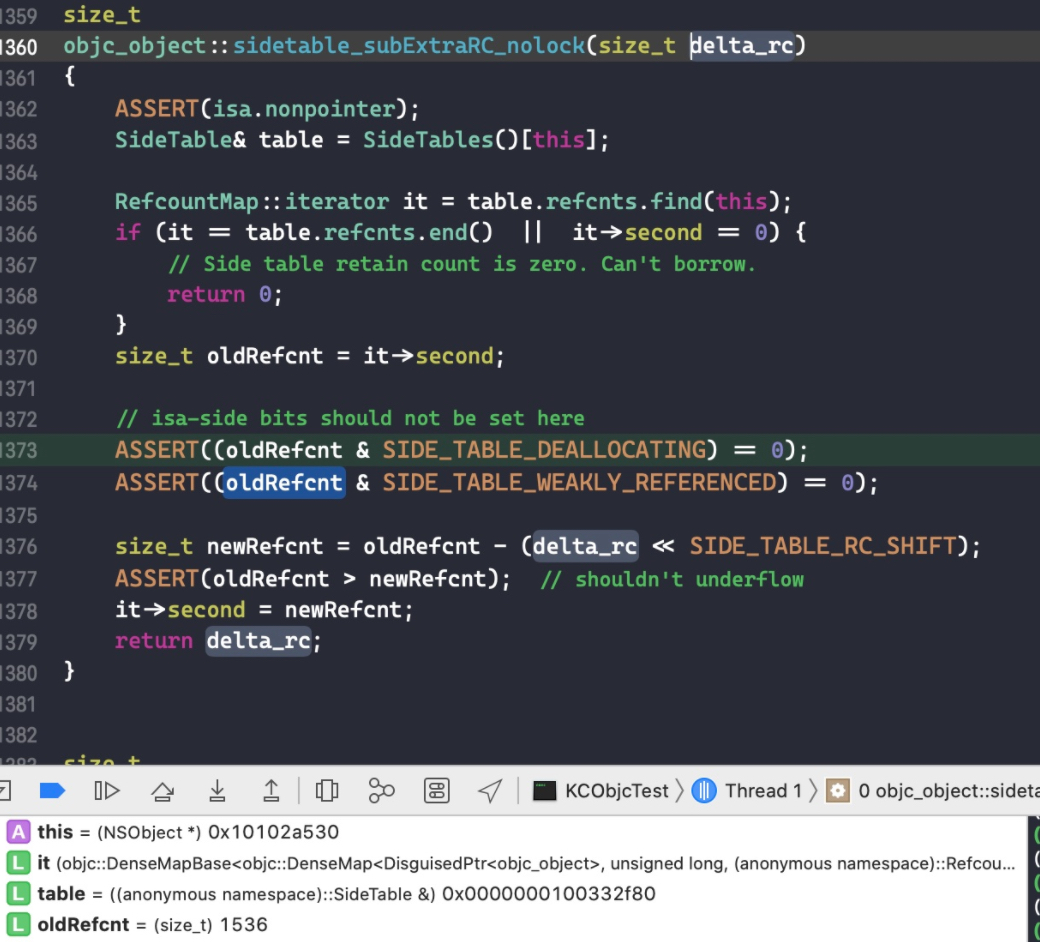
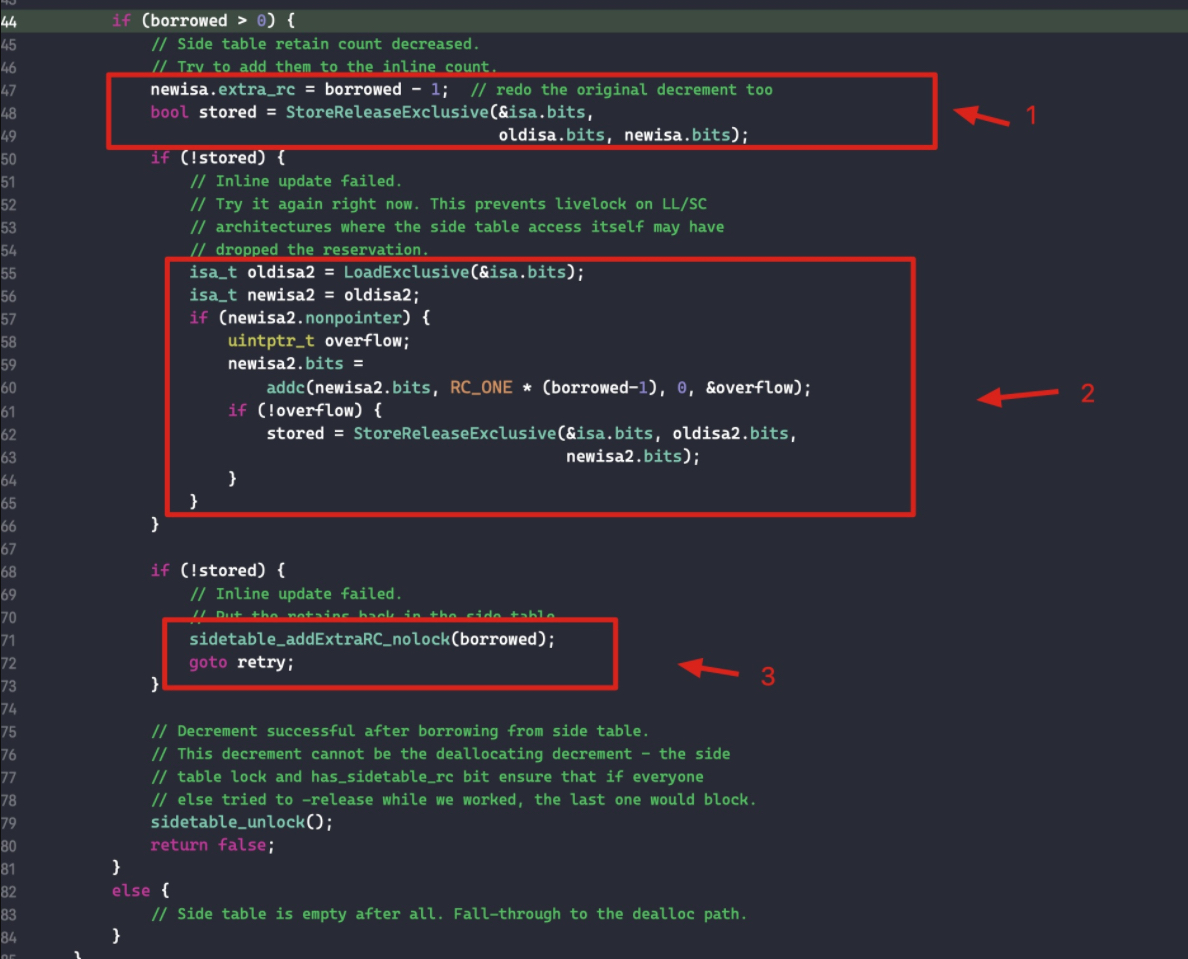
这里我们只讨论有额外引用计数存储在 sidetable,且 isa 指针里面存储的引用计数为 0 时的临界情况。代码如下:

1
2
3
4
5
6
7
8
9
10
11
12
void aoo(void) {
NSObject *o1 = [[NSObject alloc] init];
for (int i = 0; i < 512; i++) {
_objc_rootRetain(o1);
}
for (int i = 0; i < 129; i++) {
if (i == 128) {
int a = 1;
}
_objc_rootRelease(o1);
}
}

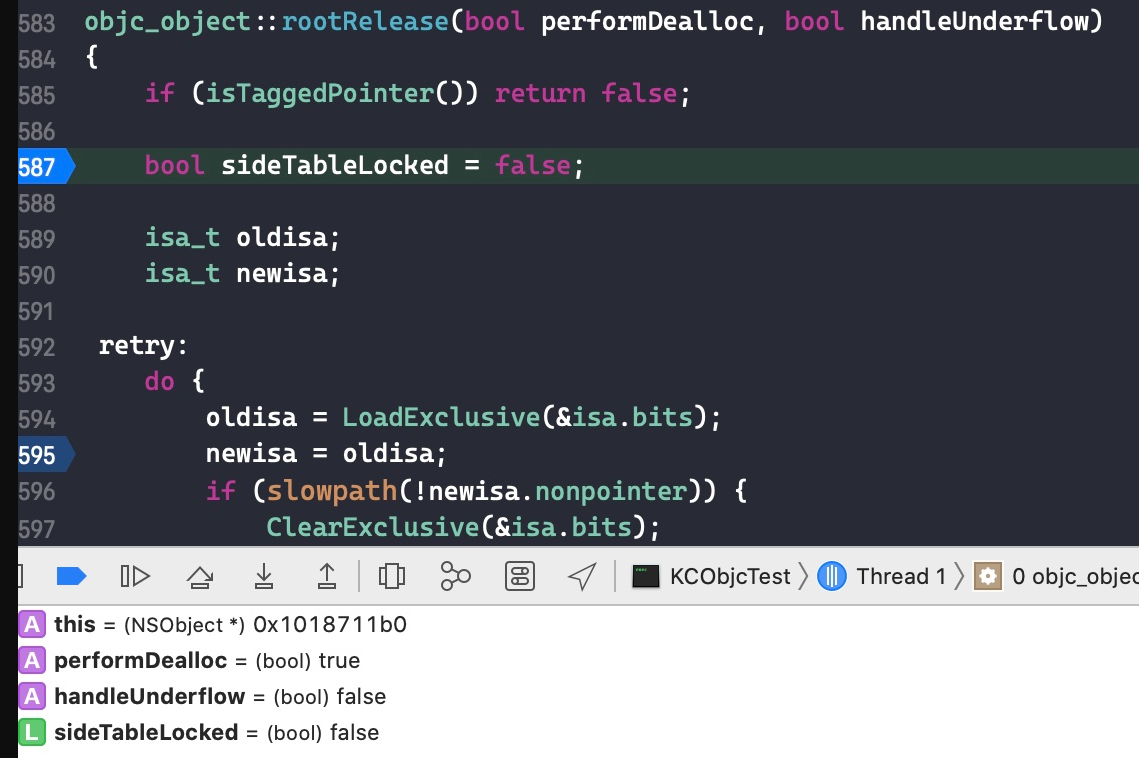
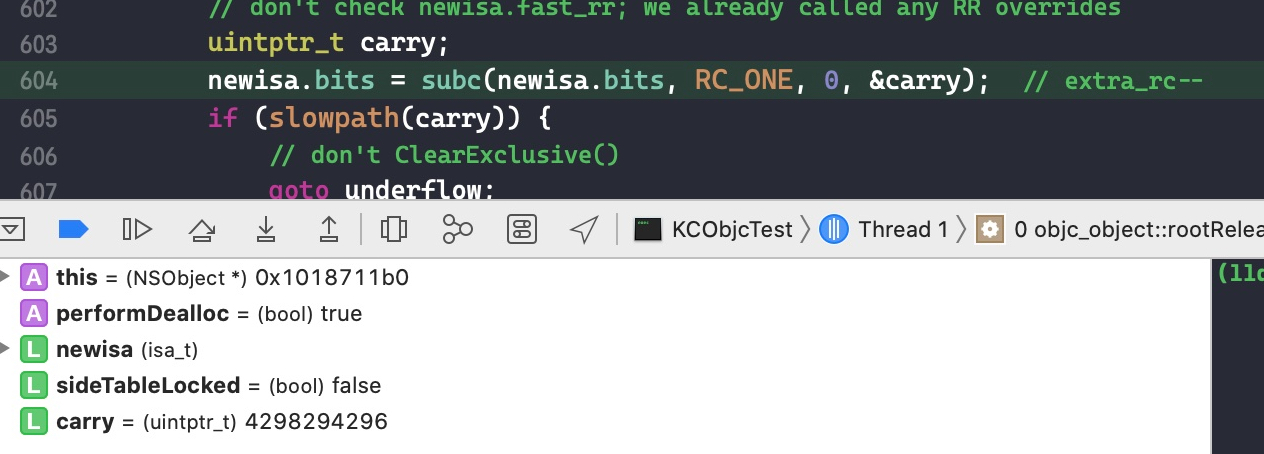
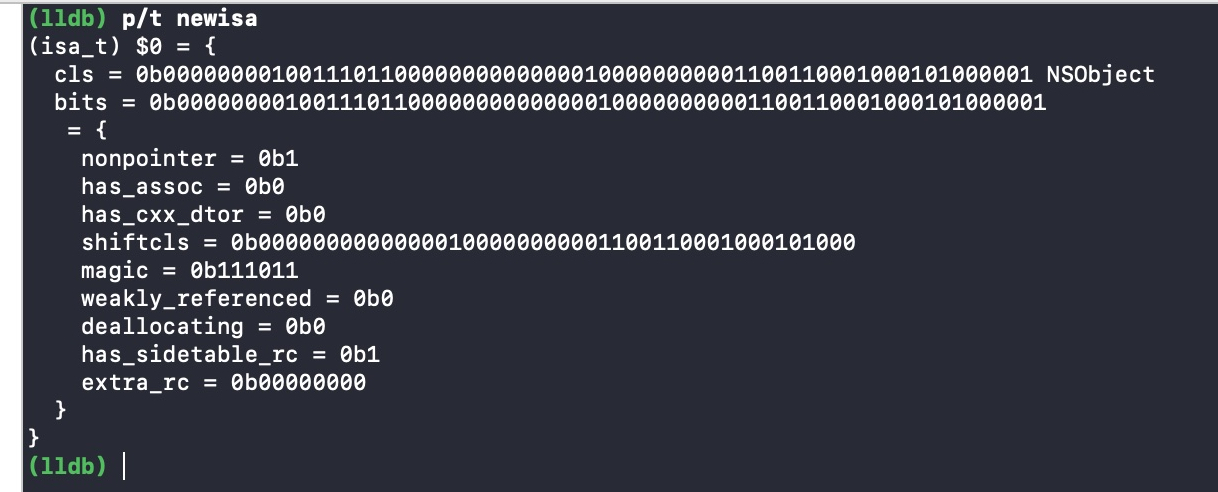
在代码int a = 1;处打个断点,此时 isa 保存的引用计数为 0。一直 step over,直到跳转到objc_object::rootRelease(bool performDealloc, bool handleUnderflow)函数。


一直点击 step over,直到停在newisa.bits = subc(newisa.bits, RC_ONE, 0, &carry);那一行

用调试命令打印看一下此时 isa 指针里面的内容

因为使用的是模拟器,所以 isa 里面只有最高的 8 个bit用来保存引用计数,之前我们减少它的引用计数 128。所以此时它 isa 指针里面保存的引用计数为 0。调试输出结果extra_rc也为0,符合预期(0b是二进制符号)

接下来系统要将引用保存在 isa 指针的引用计数 -1,并判断是否溢流。此刻它的引用计数已经为 0 了,那么对它进行 -1 操作会发生什么呢?我们接着调试,点击 step over


可以看到变量carry == 1,表示出现溢流。让我们再看一下 isa 指针里面发生了什么。


我们可以看到保存引用计数的 8 个 bit 都变成了 1,这其实就是 -1 在无符号整数中的表现形式,不懂的同学可以去了解一下补码。

接着一直 step over,我们可以看到因为溢流所以跳转到了underflow部分。一直 step over 直到跳转到如下的位置

rootRelease_underflow最终调用的还是objc_object::rootRelease()函数,只不过参数 handleUnderflow 变成了 YES。
进入该函数后,又会执行之前的那些代码,过程也是一样的,就不重复说了。接下来会来到这个位置

是的,因为没上锁,所以又会回到retry部分的代码。注释里写着是因为

Need to start over to avoid a race against the nonpointer -> raw pointer transition.

不是很明白,但是过了。继续 step over

之前引用计数溢出时,我们将RC_HALF数目的引用计数存储到了sidetable当中,此时因为溢流,所以我们从sidetable中取回同样数目的引用计数。

step into 进入objc_object::sidetable_subExtraRC_nolock()函数

在最开始的代码中,我们增加了变量o1 512 的引用计数, 在 isa 指针中保存了 128, 还剩余 384. 但是因为最低两位没有用来保存数据, 所以在 bucket 中存储的数字应该是 384 << 2, 即 1536, 符合预期

接下来的代码作用就是判断保存在 bucket 中的引用计数是否合理, 如何合理的话则将原有的数据减去RC_HALF并重新保存. 点击 step out 返回之前的函数

  • 代码块1的作用是将从 sidetable 取回了保存着的一部分引用计数, -1 保存到 isa 指针里面
  • 如果代码块1保存失败, 则用代码块2重新保存一次
  • 如果代码块2保存失败了, 则将从 sidetable 取出的引用计数重新放回去. 然后又跳回到 retry 部分
  • 保存成功则解锁, 并返回 false. 返回 true 表示这个对象需要 dealloc 了

另一种情况, 如果一个对象 isa 引用计数为 0, 且没有额外的引用计数. 那么它从 sidetable ‘借来的’ borrowed 为 0, 那么会将 isa 的 deallocating 赋值为 1, 并随后对其发送 delloc 消息进行内存消耗

最后

以上就是此次对引用计数的探究, 欢迎留言告诉我错的或者不明白的地方~

作者

千行

发布于

2020-04-16

更新于

2022-10-21

许可协议

评论